How to Sew a Kindle Sleeve with Nubim Fabric
A beginner sewing project you'll actually use every day
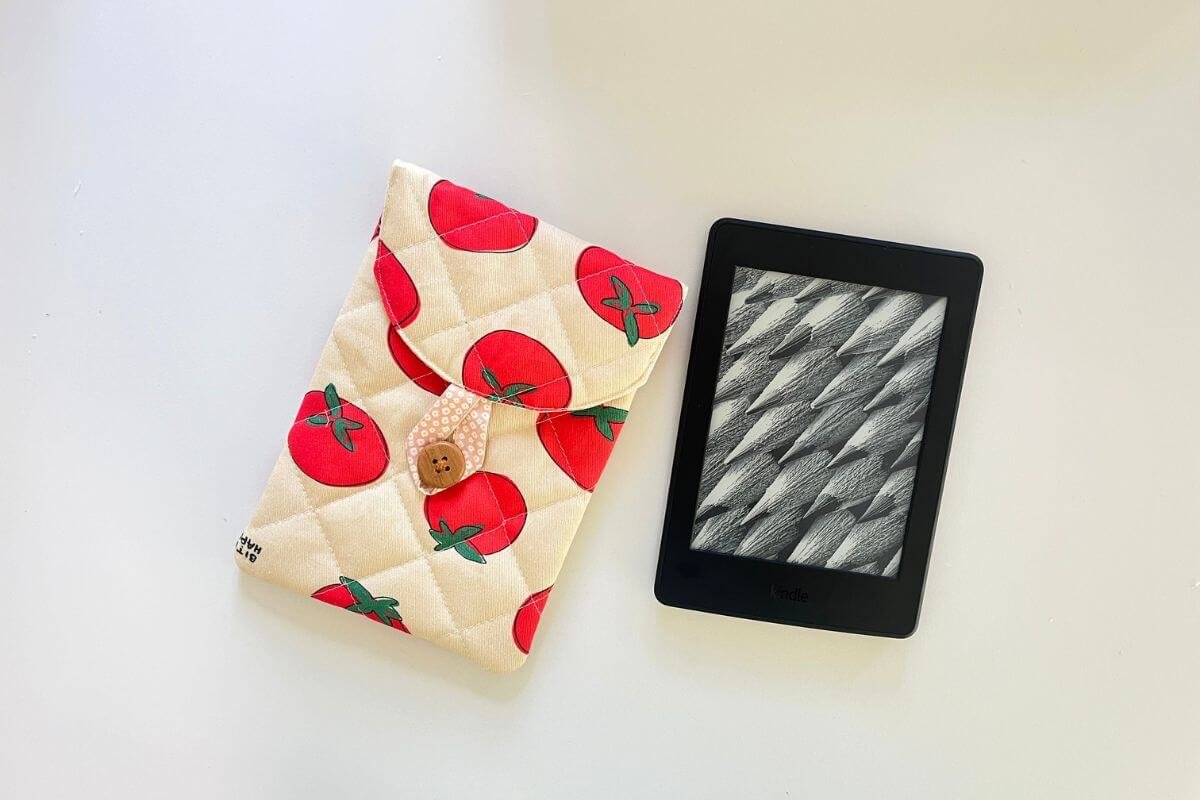
Can I tell you something a little embarrassing? I used to carry my Kindle loose in my bag. No case, no sleeve, nothing. Just living on the edge while it rattled around next to my keys and lip balm.
Then I spotted this gorgeous Korean nubim fabric while I was visiting Korea — tomatoes! cream background! cute little quilted diamonds! — and I thought: that’s going to be a Kindle sleeve.
The whole project took me one nap time. And now I will never go back to bare Kindle in my bag again.
If you’ve been looking for an easy beginner sewing project that actually gets used (not just admired and then forgotten in a drawer), this is it. A handmade Kindle sleeve takes about an hour, uses a tiny amount of fabric — perfect for scraps or a fat quarter — and costs you basically nothing compared to buying a case from a store.
The real secret of this version? Korean nubim fabric. It’s a quilted fabric with the padding already sewn in, which means no batting, no fusible fleece, and no fussing with extra layers. It’s light enough that your bag doesn’t get heavy, but padded enough to actually protect your device. And it is adorable.
Ready? Let’s make one.
Get the Free Pattern
Want the printable pattern pieces for the rounded flap? Download them free below — just subscribe to the Sewformax newsletter and it’ll land straight in your inbox.
Download the Pattern
This pattern is now exclusively available as part of my complete ‘My First Project’ Sewing Starter Kit. Click here to get the full kit and two other exclusive patterns!
Plus you’ll be the first to hear about new tutorials, fabric finds and sewing tips.
Thank you!
You have successfully joined our subscriber list.
No spam, ever. Unsubscribe anytime.
What is Nubim fabric?
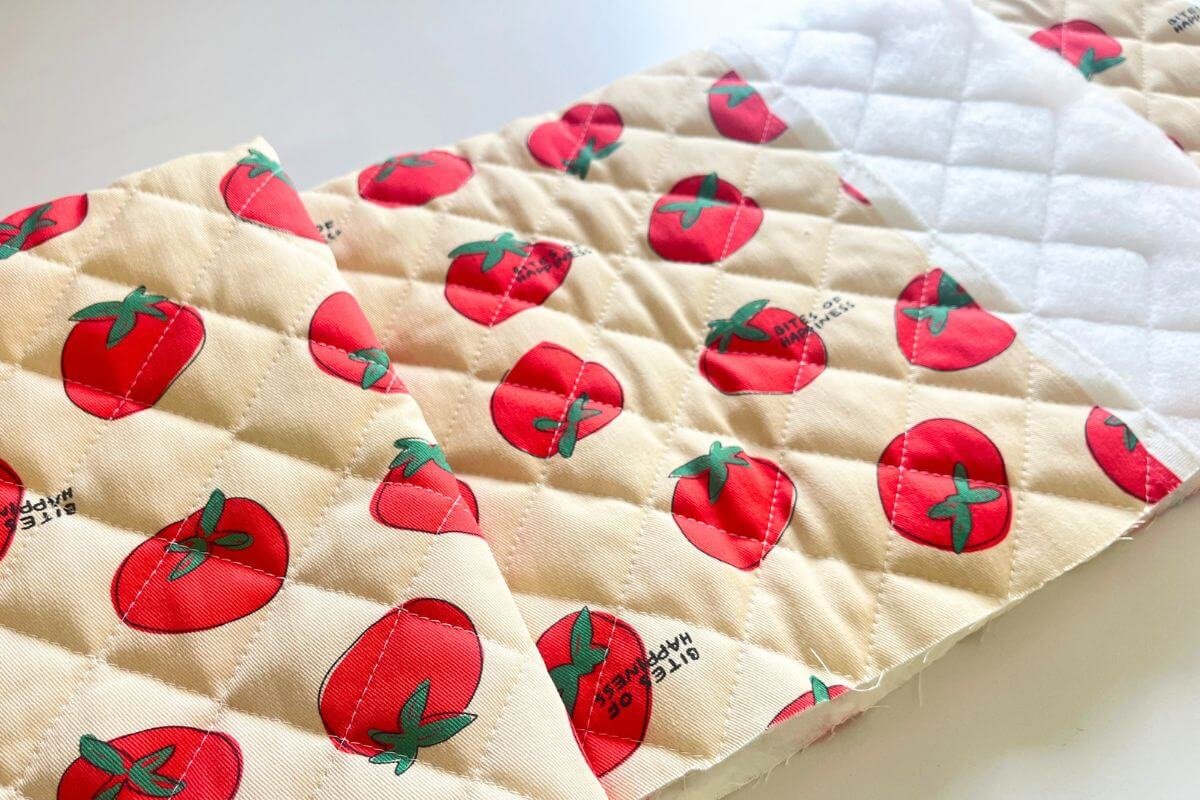
Nubim (누빔) is a Korean quilted fabric — it’s a printed cotton outer layer machine-quilted onto a layer of padding, all in one piece. You can spot it by its signature diamond quilting pattern on both the front and the back.
The beauty of it for this project is that it does the job of three layers at once. Normally a padded Kindle case needs an outer fabric, batting, and a lining. With nubim, you only need the nubim for the outside — the padding is already there. That’s fewer steps, less bulk, and a much smoother construction process.
You can find nubim fabric online through Korean fabric suppliers and increasingly through Australian fabric shops. If you’re not sure what to search for, try “Korean quilted cotton” or “nubim fabric” — it usually comes in prints ranging from florals to food prints (hello, tomatoes 🍅) to minimalist geometrics.
If you can’t get your hands on nubim, any medium-weight quilted fabric works, or you can use regular cotton with a layer of fusible fleece fused to the back before cutting.
What you'll need
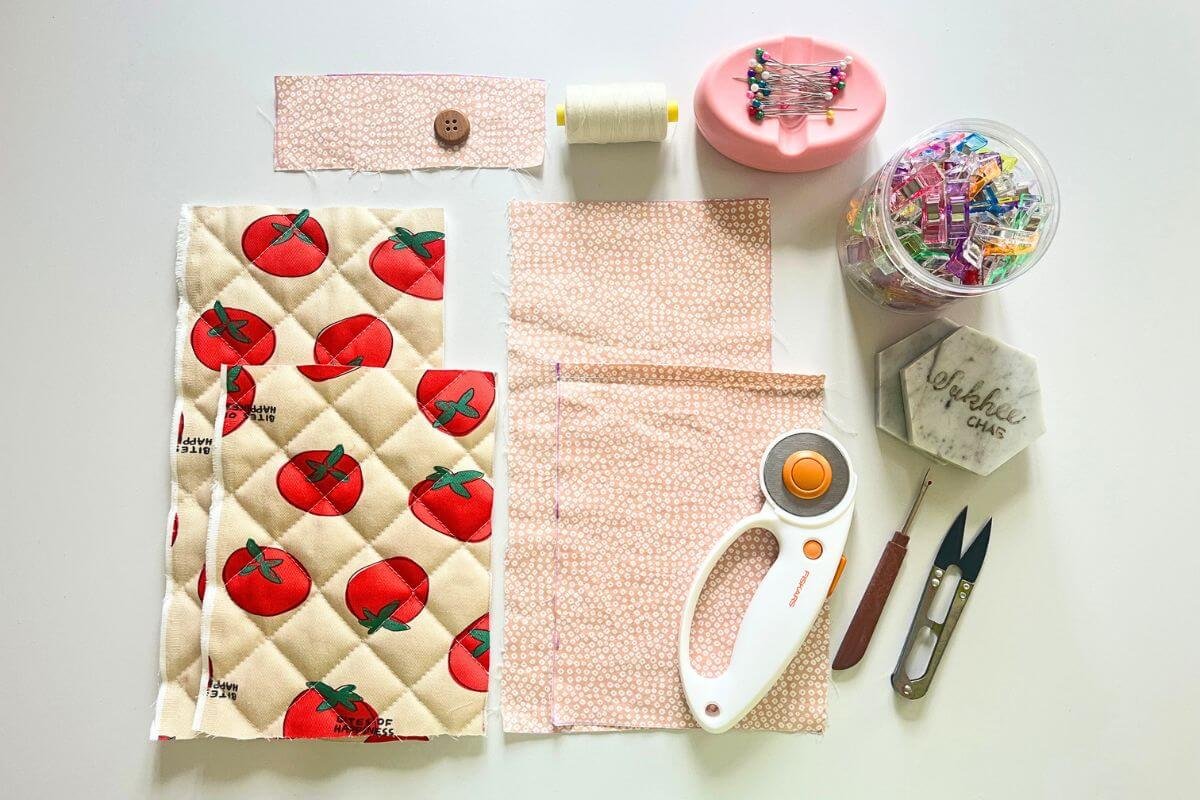
- Nubim fabric (outer) — a fat quarter is more than enough; this is a great scrap fabric project
- Lining fabric — quilting cotton, lightweight woven, anything you love; again a fat quarter or scraps will do
- 1 button — wooden, fabric-covered, or whatever you have in your tin
- Matching thread
- Fabric marker or chalk
- Pins or sewing clips
- Scissors or rotary cutter
- Iron and ironing board
- Sewing machine
- Seam ripper (your best friend, always)
💡 Scrap-friendly tip: This project uses so little fabric that it’s the perfect excuse to raid your fabric stash. The front sleeve body and lining can be different fabrics — and because they’re small pieces, even scraps that felt too small to be useful will work here.
Kindle Size Note
The finished sleeve measures approximately 5″ wide × 7″ tall, which fits the standard Kindle (4.3″ wide × 6.2″ tall).
If you have a Kindle Paperwhite (4.6″ wide × 6.6″ tall), take a ¼” seam allowance instead of the 3/8″ used throughout this tutorial and it will fit comfortably. You can also adjust the cut piece dimensions up slightly to suit any device.
Let's Get Started!
3/8″ (1cm) seam allowance throughout (unless noted)
Step 1 — Cut Your Pieces
Give your fabrics a quick press before cutting — it helps everything line up neatly.
Here are your cut pieces. All measurements are in inches.
- Cut 1 front panel in main, 1 in lining – 5.75 x 7.75
- Cut 1 back + flap panel in main and 1 in lining – 5.75 x 11.25
- Cut 1 loop strip – 2 x 4
💡 Nubim tip: Because the padding is already built in, you treat each nubim piece as your outer fabric and padding combined — just one layer to cut, no basting needed.
Rounding the Flap Corners
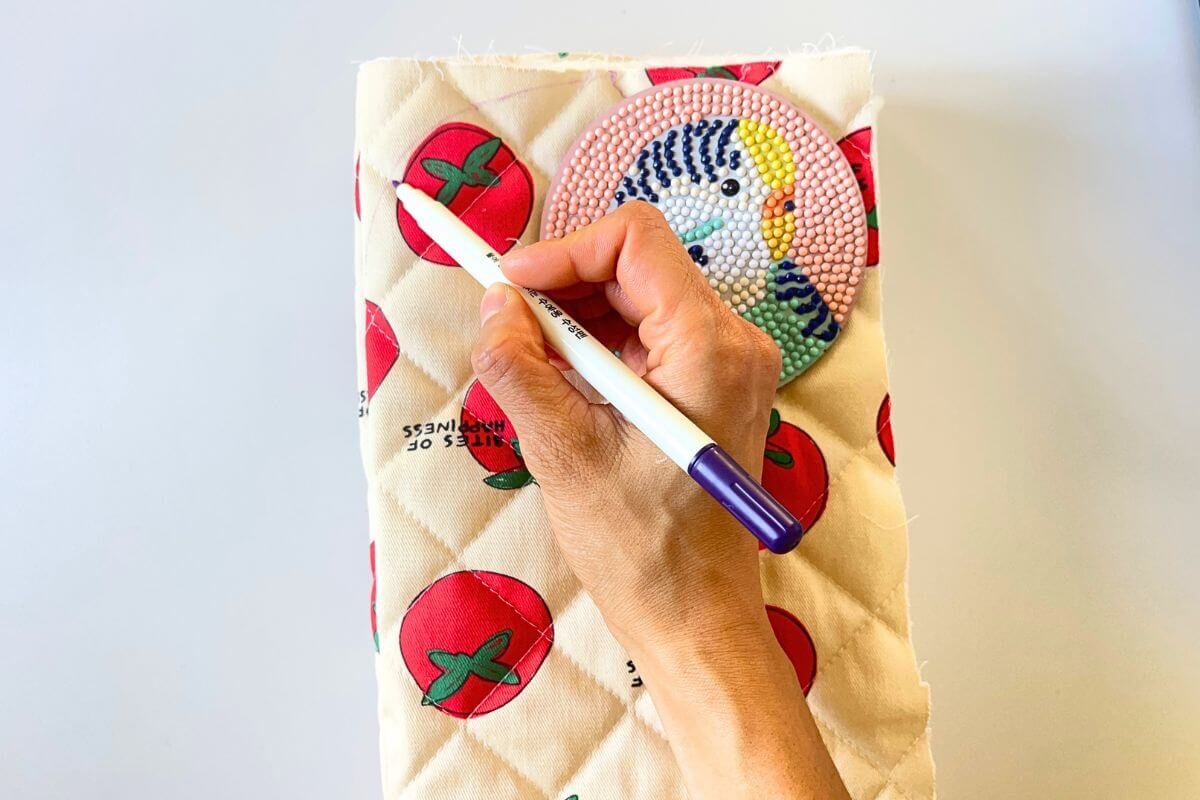
** If you are using my exclusive pattern, you can skip this step!
On your back/flap nubim piece, identify the top end — this is the flap that folds over your Kindle. Place a small round object (a coaster, jar lid, or mug) in each top corner and trace a gentle curve with your fabric marker. Cut along the line.
Repeat on the matching lining back piece so both are identical. The front pieces have straight corners on all four sides — the rounding is on the flap end of the back pieces only.
Step 2 — Make the Fabric Loop
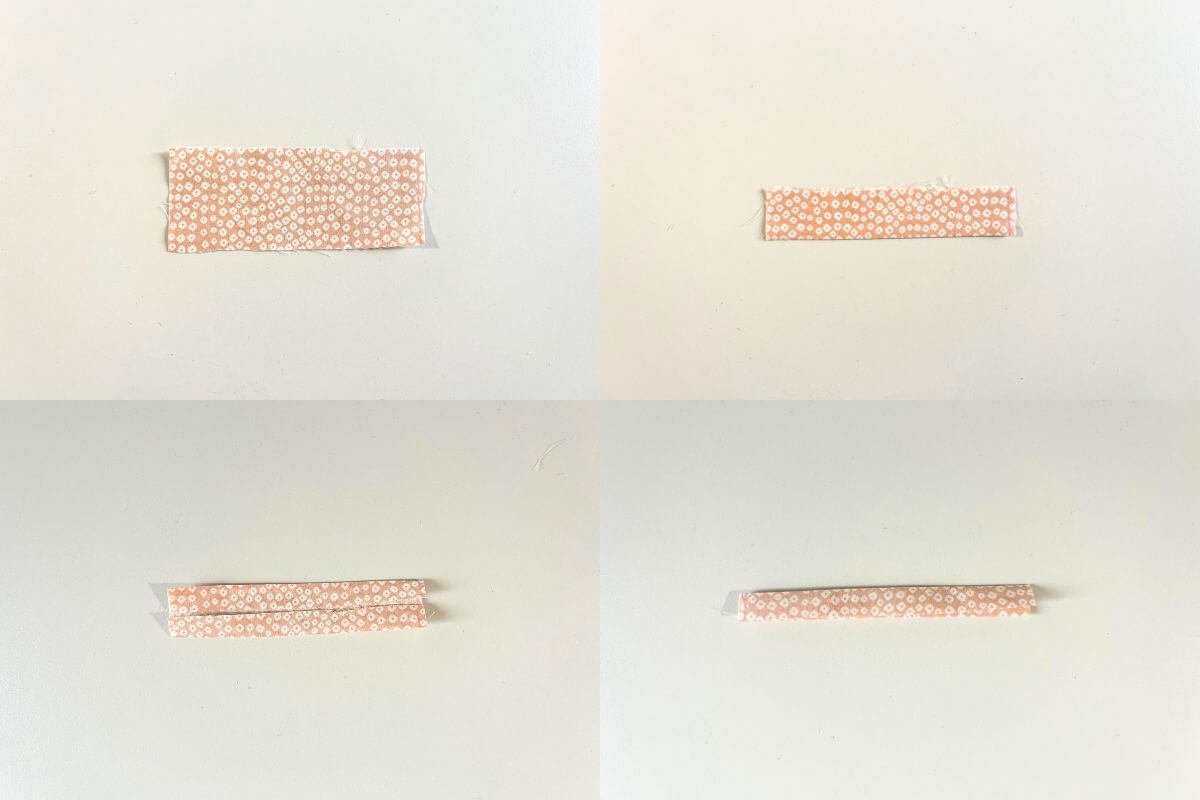
Take your 2″ × 4″ loop strip and fold it in half lengthwise, wrong sides together — press. Open it out, fold each long raw edge to the centre crease, then fold in half again so all raw edges are enclosed inside. Press well at each stage.
Edge stitch along the open long side to hold all layers together securely.
Fold the finished strip in half to form a loop. Test it around your button — it should slip over with a little ease but not be too loose. Trim if needed. Set aside.
Step 3 — Sew the Front Panel
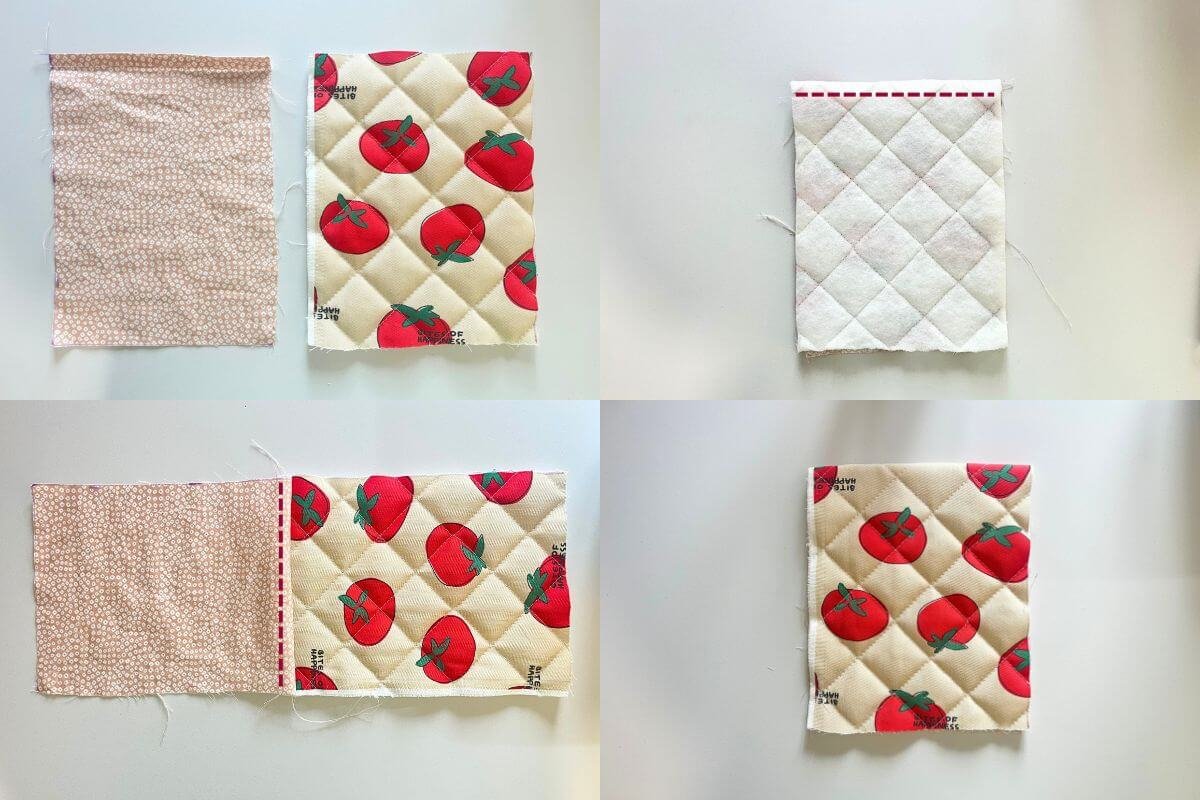
Take your front nubim piece and front lining piece. Place them right sides together, aligning along the top edge. Pin or clip in place.
Stitch across the top edge with a 3/8″ seam allowance.
Press the seam allowance toward the lining. Then understitch on the lining side — sew a line of stitching very close to the seam, catching the seam allowance underneath. This stops the lining from peeking out at the finished top edge.
Fold the lining to the wrong side and press so the top edge is clean and crisp. Set the completed front panel aside.
Step 4 — Attach the Loop
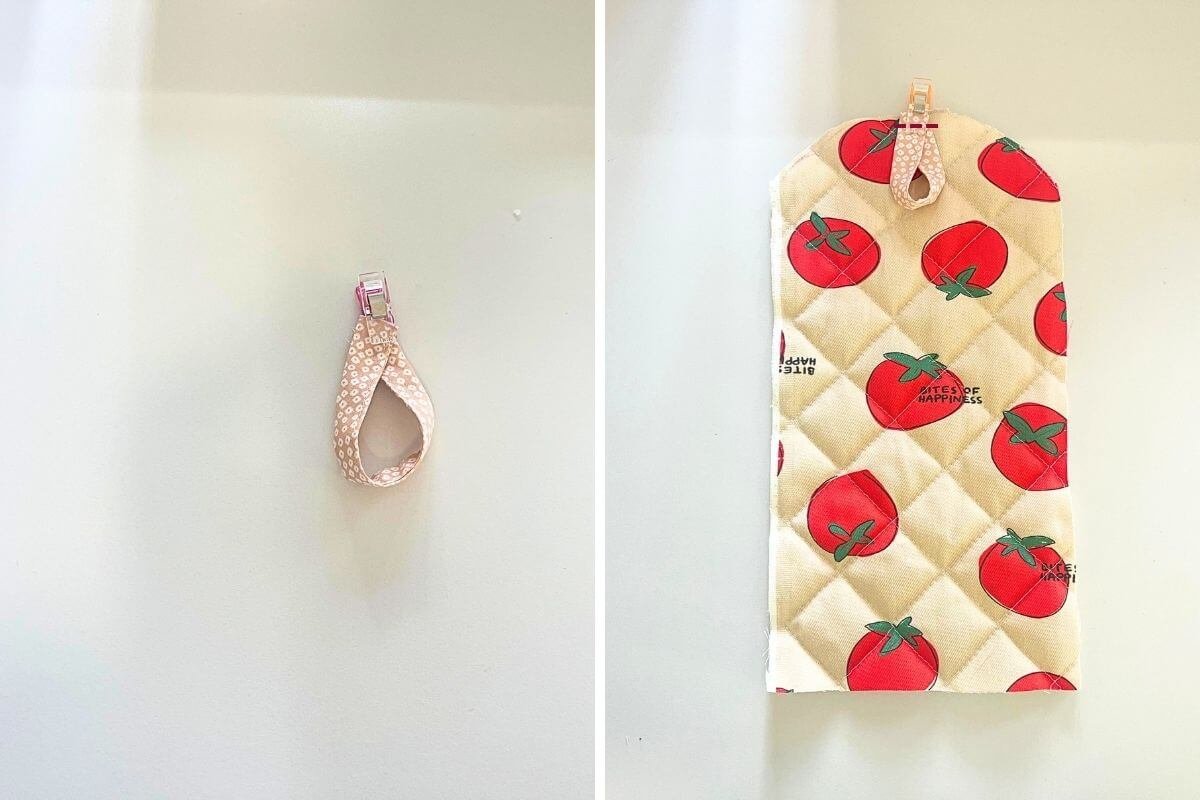
Take your back nubim piece and identify the rounded flap end at the top.
Fold your finished loop in half and pin it to the centre of the top edge, raw ends pointing inward and right sides together. Baste in place within the seam allowance — it will be sandwiched in when you sew the main seam.
💡 Double-check the loop direction before basting — the loop opening should face inward so it pops out on the right side when you turn the sleeve.
Step 5 — Assemble
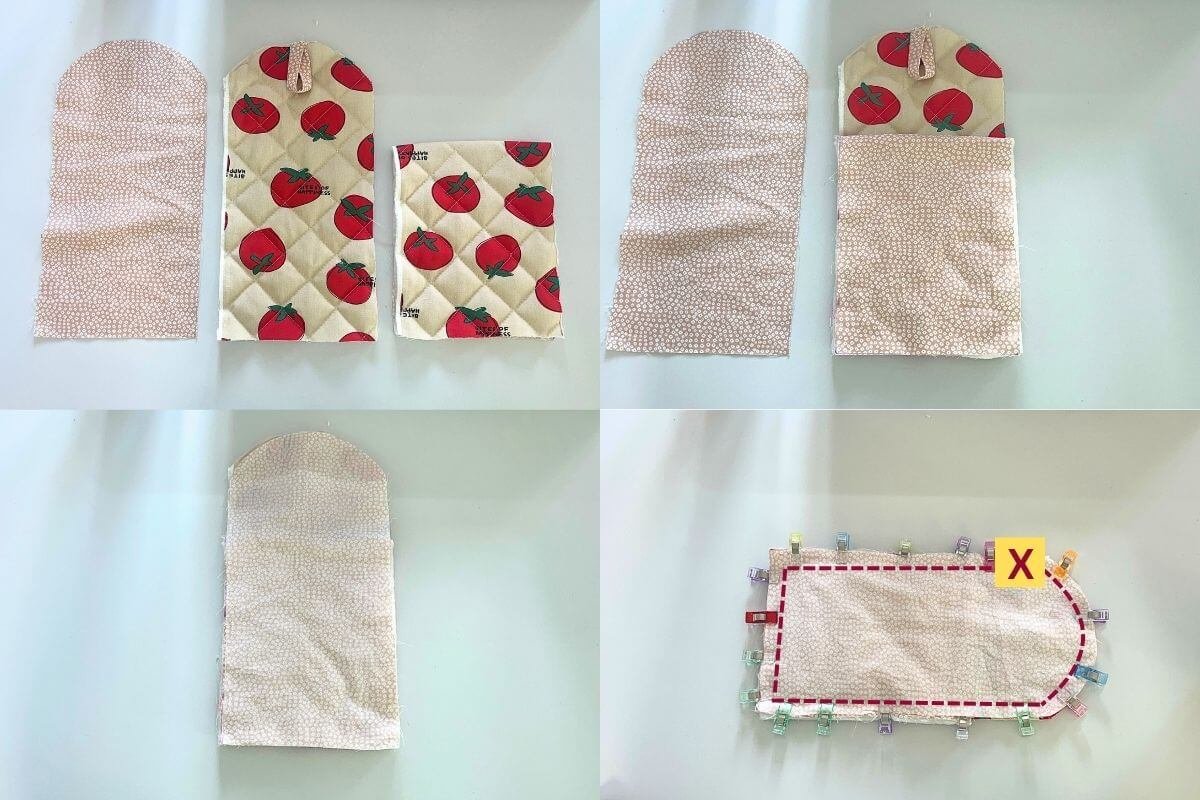
This is where it all comes together. At this point you should have three pieces ready:
- Lining back piece (with rounded top corners)
- Nubim back piece with loop basted at the top
- Completed front panel (nubim and lining stitched and pressed)
Layering order: Place the back nubim piece right side up on your work surface. Lay the completed front panel on top, right sides together, aligning the bottom edges. The front panel is shorter than the back — that’s correct.
Place the back lining piece on top, right side facing down. You now have a sandwich: back lining on top, front panel in the middle, back nubim at the bottom.
Clip all the way around. Mark a 3″ gap on one side — this is your turning gap. Don’t sew this section.
Stitch around all sides with a 3/8″ seam allowance, following the curve at the rounded flap corners. Leave the marked gap open.
💡 Curves tip: Slow right down around the rounded corners. Shorten your stitch length slightly for more control — keep your eye on the fabric edge rather than the needle.
Press the unsewn gap seam allowances toward the wrong side so they’re ready to close neatly. Clip across corners and notch the curves to reduce bulk when turned. Trim nubim from the seam allowance where possible.
Step 6 — Turn, Press, and Topstitch
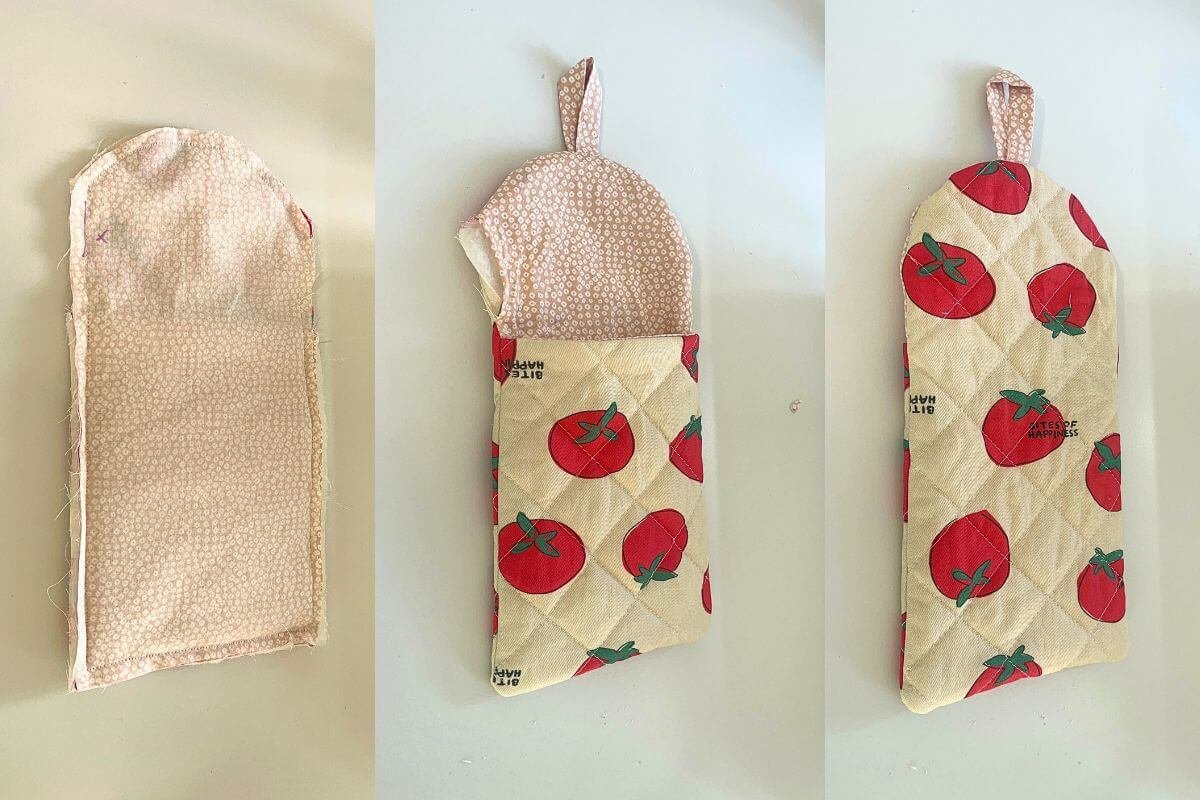
Pull everything right side out through the turning gap. Use a blunt object (a chopstick or the back of a knitting needle works well) to gently push the corners and curves into shape. Don’t use anything sharp — it’ll poke through the nubim.
Press the whole piece on a low to medium heat setting. Nubim doesn’t love very high heat — test on a scrap piece first if you’re unsure. Press the turning gap closed so the edges are perfectly flush.
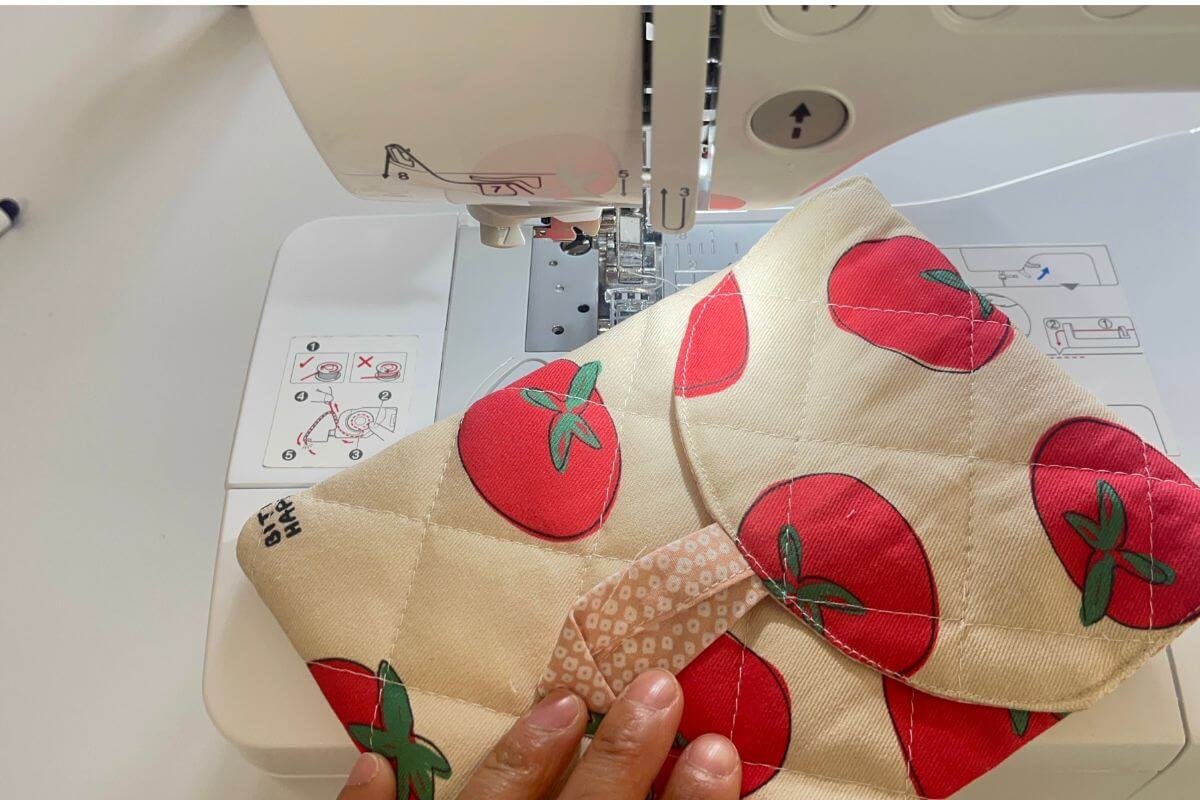
Topstitch around the entire flap edge (the rounded top portion of the back piece) approximately 1/8″ from the edge. This closes the turning gap and gives the flap a polished, professional finish. Press once more after topstitching for a really crisp result.
Step 7 — Add the Button
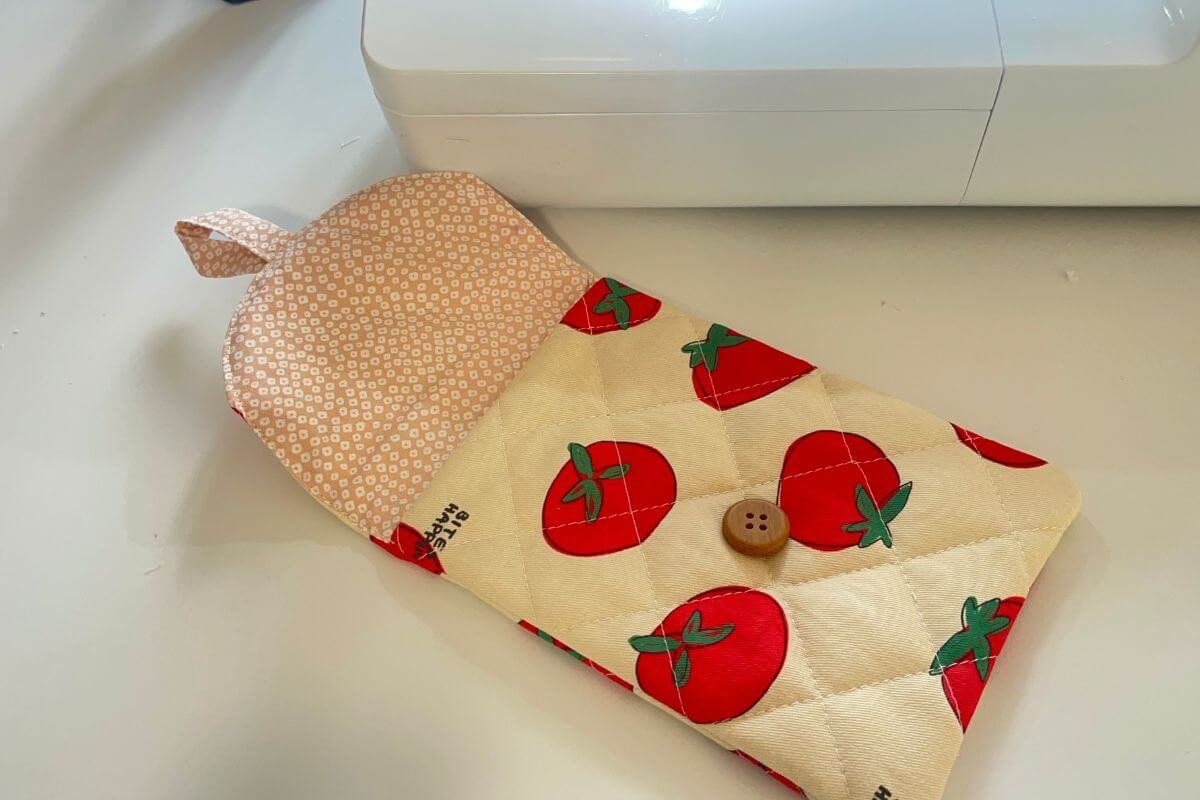
Fold the flap down over the front of the sleeve as it will sit when closed. The loop should sit at the centre front. Mark with a pin or fabric marker exactly where the loop lands — this is where your button goes.
Hand stitch the button firmly to the front panel at the marked spot, sewing through both the nubim and lining layers for strength. Give it several passes for a secure hold.
That's it — you're done! 🎉
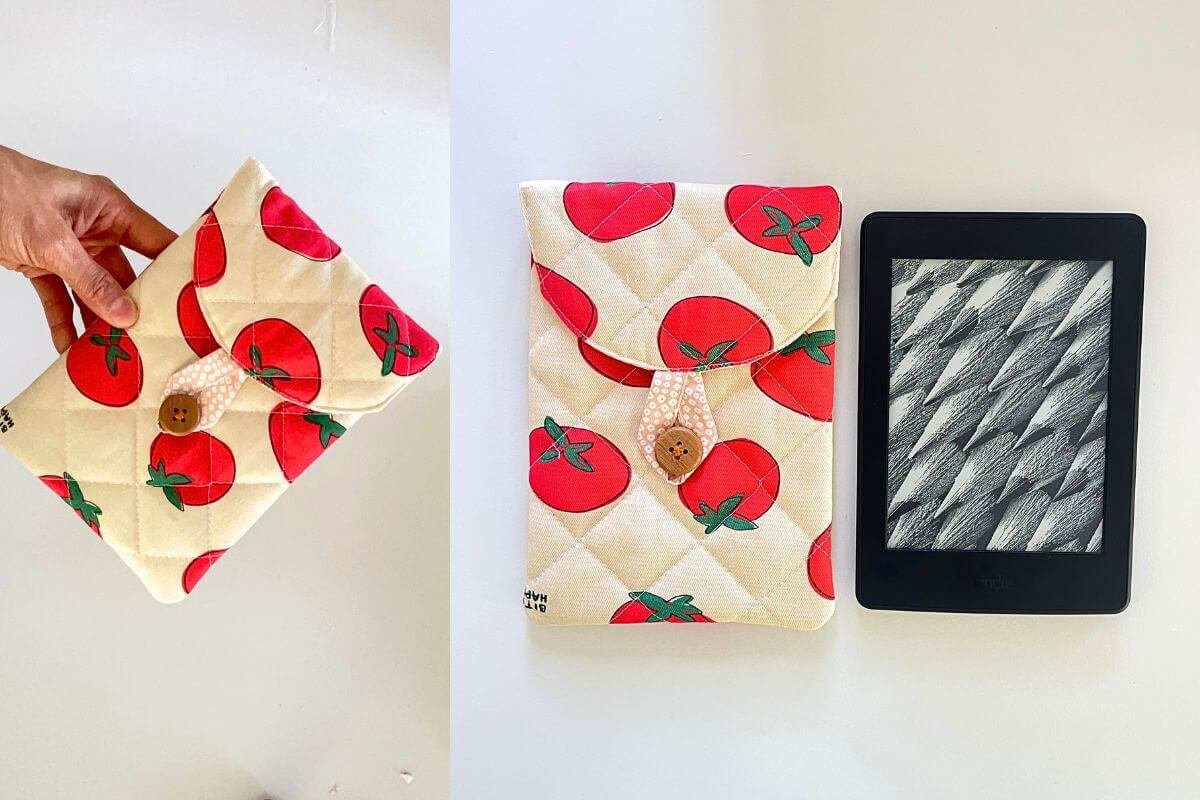
Slip your Kindle in, fold the flap down, and loop it over the button. I love everything about this project — it takes barely any fabric, costs next to nothing, and the end result looks genuinely put-together.
The nubim padding means your device is protected without the sleeve being bulky or heavy, which makes it perfect for throwing in your bag without thinking twice about it.
Tips & Troubleshooting
My loop is too tight / too loose around the button. Make the loop slightly longer if it’s too snug. If it’s too loose, swap to a larger button or take in the fold point slightly.
The lining is peeking out at the top edge. This is where understitching in Step 3 does its job. If you skipped it, go back and add it now — it makes a noticeable difference.
The nubim is hard to sew through at the seams. Try a slightly longer stitch length and a fresh needle (size 80/12 or 90/14). Slow your machine down at thick spots.
The curves came out lumpy. Make sure you clipped the seam allowance curves before turning — without those notches the fabric bunches. Press firmly after turning.
Make it Your Own
- Different fabrics for each season — swap the outer or lining for a fresh seasonal look
- Embroidery or iron-on vinyl on the flap for a personal touch
- A longer flap for more coverage — just cut the back piece an inch or two longer
- Coordinating lining that peeks out when the flap is open — sometimes mismatched is even better
Download the Pattern
Want the printable template for the rounded flap corners? Pop your email below and I’ll send it straight to you — plus you’ll be the first to hear about new tutorials, fabric finds, and sewing tips.
Download the Pattern
This pattern is now exclusively available as part of my complete ‘My First Project’ Sewing Starter Kit. Click here to get the full kit and two other exclusive patterns!
Plus you’ll be the first to hear about new tutorials, fabric finds and sewing tips.
Thank you!
You have successfully joined our subscriber list.
No spam, ever. Unsubscribe anytime.